□ 단원 : MFC 구조, 화면출력
□ 목표 : MFC CObject 기반 클래스 생성 & 화면 출력
□ 주요 연습 내용 : CObject, CBitmap, CPen, Rectangle, DrawText, LoadImage
□ 준비자료 : 3_CPerson.zip (Person.cpp, Person.h, Student.cpp, Student.h, Faculty.cpp, Faculty.h, PersonManager.cpp, PersonManager.h,
ChildView.cpp, ChildView.h, MainFrm.cpp, MainFrm.h, Simple.cpp, Simple.h, etc)
1218640374.zip
□ 참고: VC++는 MFC Application Program을 사용하는 방식으로 작성한다.
http://dis.dankook.ac.kr/lectures/hci08/entry/MFC-Application-Program
[연습문제]
연습문제 Ex3 (Due by 10/26 일 24시까지)
-cyber 강의실 (cyber.dku.edu)로 source code, executable file, solution/project VC++ 2005 file, 보고서를 학번_이름_Ex3.zip으로 묶어서 낼 것. 보고서 (30%)
0. 생성한 프로그램의 메인 프레임의 Title을 “HCI2_Ex3_이름_학번”으로 바꾼다. (예: Resource View에서 String Table의 IDR_MAINFRAME에 Caption을 “HCI2_Ex3_<이름>_<학번>”으로 하면 됨)
1. CPerson, CFaculty, CStudent 클래스를 CObject 기반으로 만들고 필요한 함수를 추가한다. (30%)
– 모든 변수명 지정 시 헝가리언 표기법을 사용한다.
– CPerson, CFaculty, CStudent 클래스 Show() 함수를 output 창에 출력할 수 있도록 TRACE를 사용한다.
– CPerson, CFaculty, CStudent 클래스 DrawText(CPaintDC& dc, int x, int y, int width, int height) 함수를 작성한다.
– dc.Rectangle함수를 이용하여 사각형 외곽을 그린다.
– LoadImage와 dc.StretchBlt를 이용하여 사진을 그린다.
– dc.DrawText를 사용하여 “이름: “, “ID : “, “전화: “, “주소: ”
등등 타이틀을 그린다.
– dc.DrawText를 사용하여 실제 이름, ID, 전화, 주소 등등을 그린다.
– 힌트: dc.DrawText(LPCTSTR, int, LPRECT, UINT) 함수에서 RECT 구조체의 x, y는 화면에 출력할 시작점, width는 각각 데이터필드를 출력할 사이 간격, height는 출력할 텍스트의 높이. DrawText 함수는 http://msdn2.microsoft.com/en-us/library/ms533909.aspx 참고할 것.
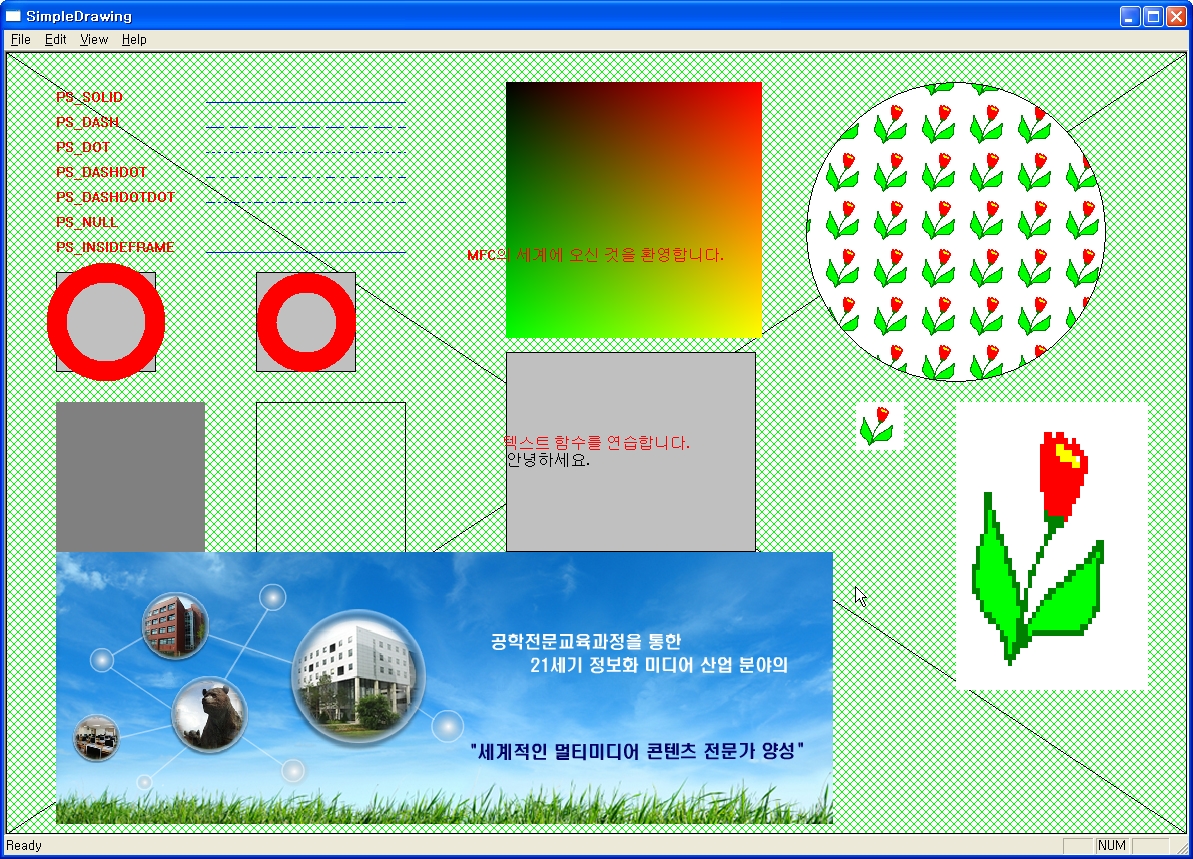
– 힌트: 사진그리기는 SimpleDrawing을 참고할 것
CDC memdc;
memdc.CreateCompatibleDC(&dc);
HBITMAP hImage = (HBITMAP) LoadImage(AfxGetInstanceHandle(),
“멀티미디어.bmp”, IMAGE_BITMAP, 0, 0, LR_LOADFROMFILE);
memdc.SelectObject(hImage);
dc.StretchBlt(50, 500, 777, 272, &memdc, 0, 0, 777, 272, SRCCOPY);
2. CPersonManager 클래스는 CObList를 이용하여 CPerson, CStudent, CFaculty 목록을 통합 관리한다. (30%)
– CObList를 사용하여, CPerson, CStudent, CFaculty 목록을 관리한다.
– CPerson, CFaculty, CStudent 클래스의 Show를 불러서 output 창에 출력하는 Show() 함수를 작성한다.
– 모든 CPerson, CFaculty, CStudent 클래스의 DrawText를 불러서 화면에 출력해 주는 void DrawText(CPaintDC& dc, int x, int y, int width, int height) 함수를 추가한다.
– 힌트: Show() 함수와 DrawText(…) 함수에는 실시간클래스정보를 사용하여 객체의 데이터형에 따른 Show()와 DrawText(…) 함수를 부르도록 한다.
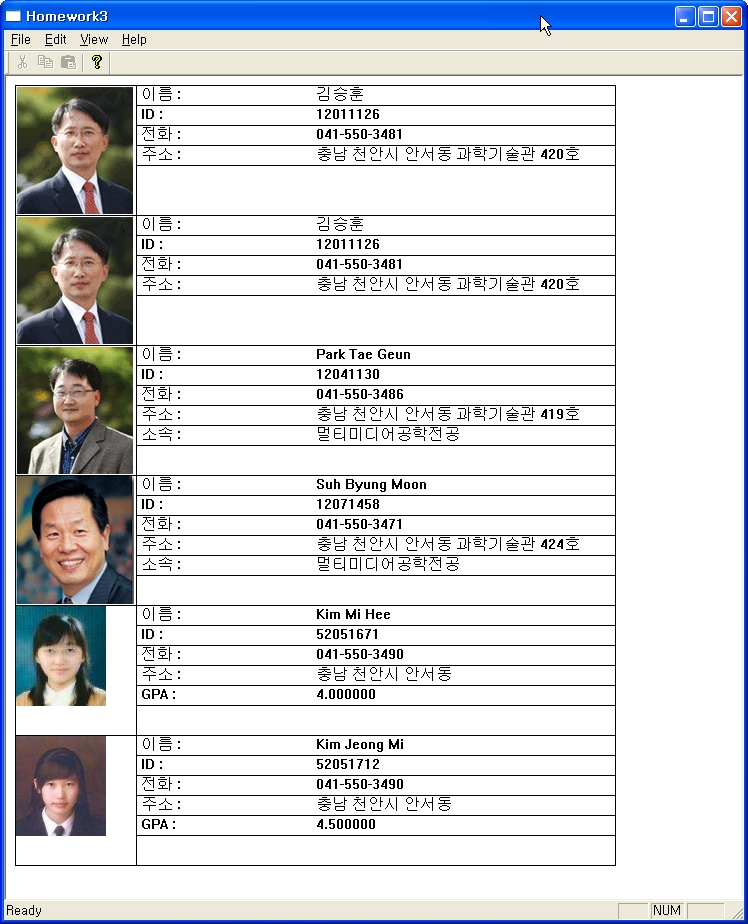
3. CChildView::OnPaint()에서 본인이 원하는 5~6개 정도의 CPerson, CFaculty, CStudent를 추가하고, 리스트 모양으로 화면에 출력한다. (10%)
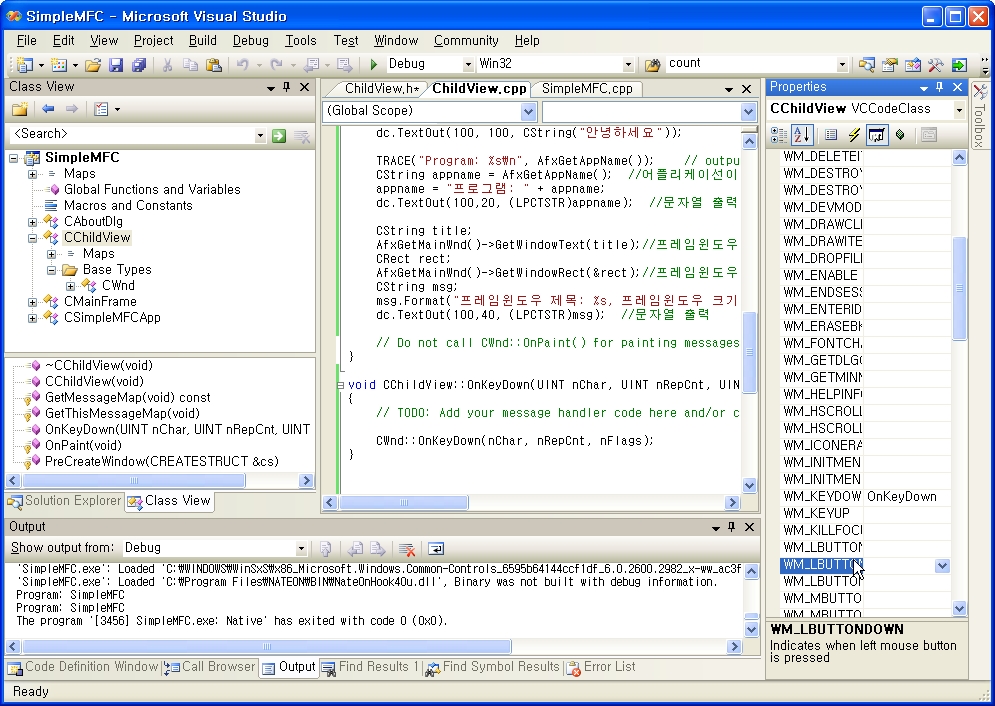
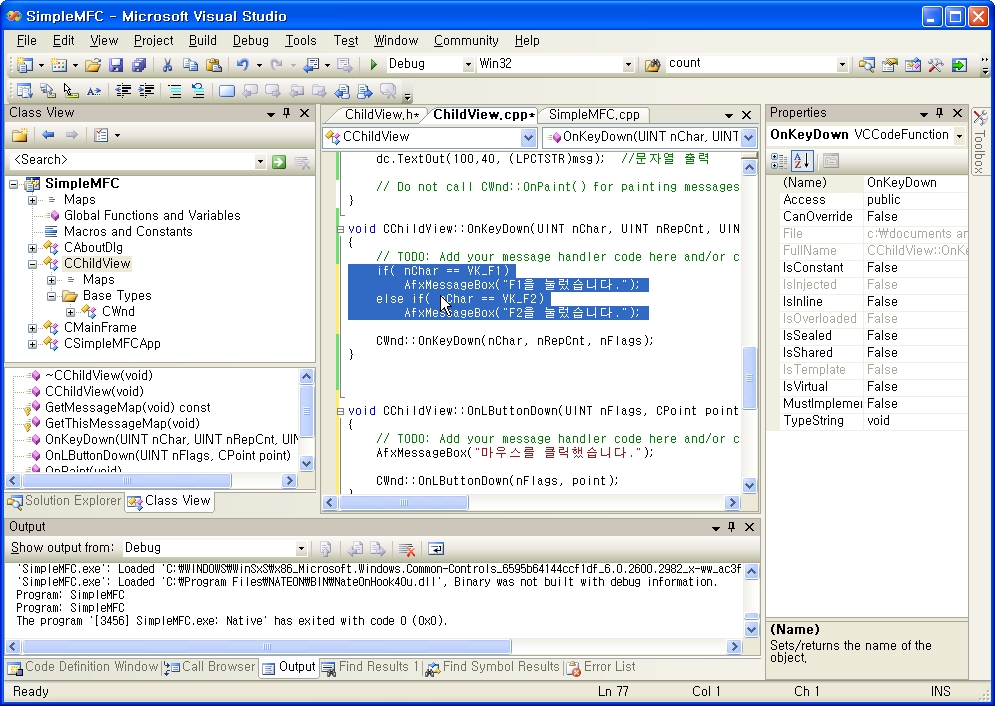
void CChildView::OnPaint() // 아래 출력 화면의 예시
{
CPaintDC dc(this);
// TODO: Add your message handler code here
CPersonManager pList;
CPerson person1(“김승훈”, 12011126, “041-550-3481”,
“충남 천안시 안서동 과학기술관 420호”);
pList.Add(&person1);
CPerson person2(person1);
pList.Add(&person2);
CFaculty prof1(“Park Tae Geun”, 12041130, “041-550-3486”,
“충남 천안시 안서동 과학기술관 419호”, “멀티미디어공학전공”);
pList.Add(&prof1);
CFaculty prof2(“Suh Byung Moon”, 12071458, “041-550-3471”,
“충남 천안시 안서동 과학기술관 424호”, “멀티미디어공학전공”);
pList.Add(&prof2);
CStudent student1(“Kim Mi Hee”, 52051671, “041-550-3490”,
“충남 천안시 안서동”, 4.0);
pList.Add(&student1);
CStudent student2(“Kim Jeong Mi”, 52051712, “041-550-3490”,
“충남 천안시 안서동”, 4.5);
pList.Add(&student2);
// PersonList TRACE 출력
pList.Show();
// PersonList 화면출력
pList.DrawText(dc, 10, 10, 250, 20);
}
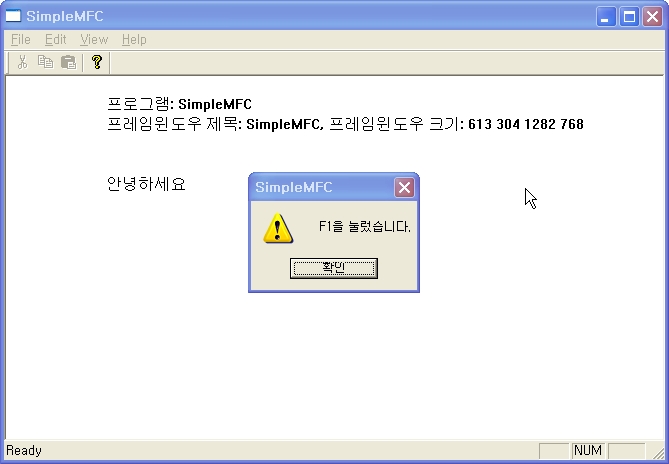
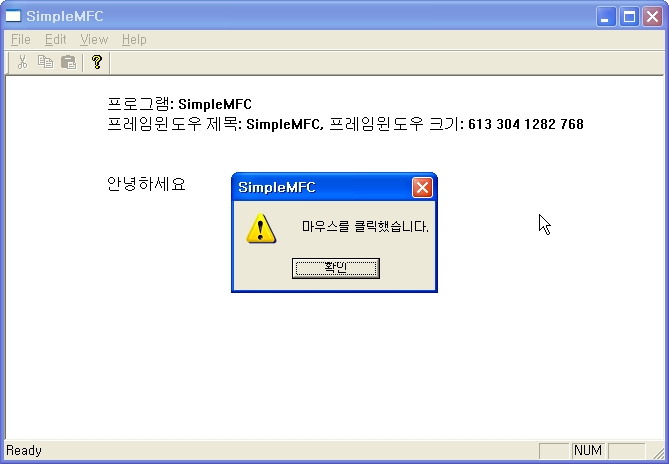
[참고] 출력화면 예시