material

http://dis.dankook.ac.kr/lectures/cg07/entry/lighting-예제
shading model – GL_FLAT/GL_SMOOTH shademodel.cpp
 |  |
if (shading == GL_FLAT)
glShadeModel(GL_FLAT);
else if (shading == GL_SMOOTH)
glShadeModel(GL_SMOOTH);
glPushMatrix();
glTranslatef(-1.0, 0.0, 0.0);
glBegin(GL_TRIANGLES);
glColor3f(1, 0, 0); // red
glVertex3f(-1, -1, 4);
glColor3f(0, 1, 0); // green
glVertex3f(1, -1, 4);
glColor3f(0, 0, 1); // blue
glVertex3f(0, 1, 4);
glEnd();
glPopMatrix();
glPushMatrix();
glTranslatef(1.0, 0.0, 0.0);
glBegin(GL_TRIANGLES);
glColor3f(0, 0, 1); // blue
glVertex3f(-1, -1, 4);
glColor3f(0, 1, 0); // green
glVertex3f(1, -1, 4);
glColor3f(1, 0, 0); // red
glVertex3f(0, 1, 4);
glEnd();
glPopMatrix();
gluQuadrics을 lighting을 사용한 예와 사용하지 않은 예
 |  |
 |
그림자그릴때 Double Blending Effect를 없애려고 하거나 거울면에 반사되는 것을 그릴때 Stencil Buffer를 사용
http://www.opengl.org/archives/resources/features/StencilTalk/
Planar Shadow
Projection Shadow
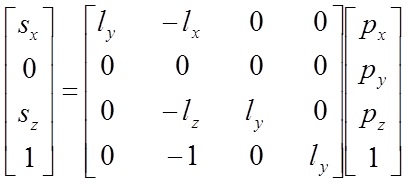
// create a shadow matrix that will project the desired shadow
void buildShadowMatrix(GLfloat shadowMat[16], GLfloat plane[4], GLfloat lightpos[4])
{
GLfloat dot; // dot product of light position and ground plane normal
dot = plane[0]*lightpos[0] + plane[1]*lightpos[1] +
plane[2]*lightpos[2] + plane[3]*lightpos[3];
shadowMat[0] = dot – lightpos[0] * plane[0];
shadowMat[1] = – lightpos[0] * plane[1];
shadowMat[2] = – lightpos[0] * plane[2];
shadowMat[3] = – lightpos[0] * plane[3];
shadowMat[4] = – lightpos[1] * plane[0];
shadowMat[5] = dot – lightpos[1] * plane[1];
shadowMat[6] = – lightpos[1] * plane[2];
shadowMat[7] = – lightpos[1] * plane[3];
shadowMat[8] = – lightpos[2] * plane[0];
shadowMat[9] = – lightpos[2] * plane[1];
shadowMat[10] = dot – lightpos[2] * plane[2];
shadowMat[11] = – lightpos[2] * plane[3];
shadowMat[12] = – lightpos[3] * plane[0];
shadowMat[13] = – lightpos[3] * plane[1];
shadowMat[14] = – lightpos[3] * plane[2];
shadowMat[15] = dot – lightpos[3] * plane[3];
}
Reflection
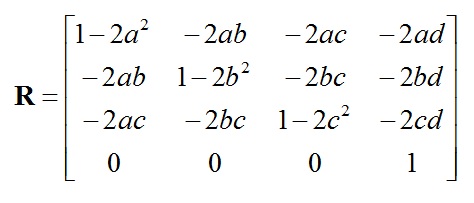
// create a reflection matrix that will project the desired shadow
void buildReflectionMatrix(GLfloat reflectionMat[16], GLfloat plane[4])
{
reflectionMat[0] = 1 – 2 * plane[0] * plane[0];
reflectionMat[1] = – 2 * plane[0] * plane[1];
reflectionMat[2] = – 2 * plane[0] * plane[2];
reflectionMat[3] = – 2 * plane[0] * plane[3];
reflectionMat[4] = – 2 * plane[1] * plane[0];
reflectionMat[5] = 1 – 2 * plane[1] * plane[1];
reflectionMat[6] = – 2 * plane[1] * plane[2];
reflectionMat[7] = – 2 * plane[1] * plane[3];
reflectionMat[8] = – 2 * plane[2] * plane[0];
reflectionMat[9] = – 2 * plane[2] * plane[1];
reflectionMat[10] = 1 – 2 * plane[2] * plane[2];
reflectionMat[11] = – 2 * plane[2] * plane[3];
reflectionMat[12] = 0.0;
reflectionMat[13] = 0.0;
reflectionMat[14] = 0.0;
reflectionMat[15] = 1.0;
}
http://dis.dankook.ac.kr/lectures/cg11/entry/OpenGL-Shadow-Reflection
town
-LEFT/RIGHT/UP/DOWN – x축/z축으로 카메라의 위치이동
uptown
– LEFT/RIGHT/UP/DOWN 키와 LEFT/MIDDLE/RIGHT 마우스버튼으로 카메라이동
LEFT/RIGHT/UP/DOWN – y축/x축으로 물체를 회전시킴
LEFT MOUSEBUTTON MOTION – x축과 y축으로 물체를 회전시킴
MIDDLE MOUSEBUTTON MOTION – x축과 y축으로 물체를 이동시킴
RIGHT MOUSEBUTTON MOTION – x축과 z축으로 물체를 이동시킴
navtown
– camera class를 사용하여 x/y/x축 카메라의 위치이동과 x/y/x축 카메라의 방향이동
F1&F2 – x축 카메라 위치이동
F3&F4 – y축 카메라 위치이동
F5&F6 – z축 카메라 위치이동
F7&F8 – x축 카메라 방향이동
F9&F10 – y축 카메라 방향이동
HOME&END – z축 카메라 방향이동
그래픽스 프로그래밍(321190) 실습 #2
– 3D graphics & hierarchical transformation & shading
(321190)
강사: 박경신
2012년 5월 8일
제출 방법: 2012년 5월 24일(목) 밤12시까지
(e-learning 강의실에 실행파일과 소스코드와 리포트를 전부 “학번이름_숙제2.zip”으로 묶어서 제출하도록 합니다. 또한, 소스코트 폴더에 .cpp만 담지 말고 비주얼 스튜디오에서 만든 프로젝트 폴더를 담기 바랍니다.)
참고자료: oglclass-starter.zip 3219007711.zip
0. Display window 크기는 1000 x 1000로 한다.
1. Hierarchical transformation 구조를 가진 놀이시설이 있는 놀이터를 만든다. (30점)
-gluPerspective(60, 1, 0.1, 1000)를 사용한다.
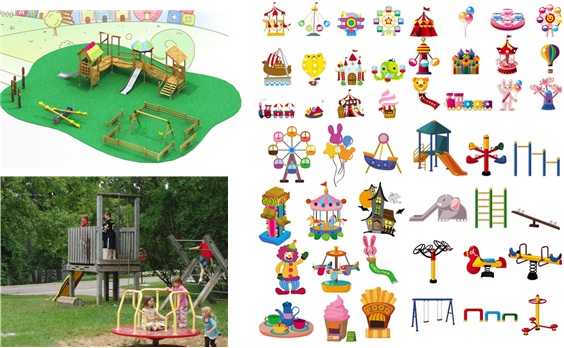
-Primitives 예제 (circle, cube, cylinder, sphere, square)와 Geometry예제 (GLU quadrics, GLUT objects)와 Transformation 예제 (car, orbit, planet, robot, simple solar system)를 참고하여 본인만의 ‘놀이터 (그네, 시소, 미끄럼틀, 회전놀이, 정글짐, 등등’를 구성하여 만든다.
-‘놀이터’의 ‘놀이시설’은 3개 이상으로 구성한다. (보고서에 놀이터 스케치 첨부할 것)
-‘놀이시설’ 중에 하나는 적어도 3단계 이상의 계층적 구조를 갖는 3차원 물체로 구성한다. 이때 ‘놀이시설’의 위치는 물체의 균형(balance)을 고려해서 안정적으로 보이도록 한다.
–집이나 나무 등으로 놀이터 주변을 꾸민다.
2. ‘Space bar’-key를 누르면 ‘놀이시설(예: 시소, 그네, 회전놀이 등등)’ 하나가 움직인다. (20점)
-‘space bar’-key는 ‘놀이시설’ 움직이거나 멈추게 하는 toggle button이다.
–움직이는 모드에서는 ‘놀이시설’이 천천히 좌우로 움직이거나 회전을 한다. – 힌트: Idel() 함수를 사용할 것.
–가능하다면, 2단계 이상의 계층적 구조의 (즉, 부분적으로 다른) 움직임을 ‘놀이시설’ 물체에 적용하도록 한다.
3. 전체적인 장면에 조명과 재질을 사용하여 3차원 장면의 사실감을 더한다. (10점)
4. 창의성, 소스코드 주석처리, 리포트 (40점)