lecture13
Lighthouse3D GLSL Tutorial
Lighthouse3D GLSL Tutorial
http://www.lighthouse3d.com/tutorials/glsl-core-tutorial/
실력으로 학벌을 뒤집어라
강릉대 전자공학과
Camera & View Matrix
 camera.cpp camera.cpp | camera.h |
F1&F2 – x축 카메라 위치이동
F3&F4 – y축 카메라 위치이동
F5&F6 – z축 카메라 위치이동
F7&F8 – x축 카메라 방향이동 (PITCH)
F9&F10 – y축 카메라 방향이동 (YAW)
HOME&END – z축 카메라 방향이동 (ROLL)
// main.cpp ——————————————
Camera camera1(FLY);
void init( void )
{
// 중간생략..
View = camera1.lookAt(g_eye, g_at, g_up);
}
void display( void )
{
// 중간생략..
View = camera1.View();
}
void specialkey(int key, int x, int y)
{
if (key == GLUT_KEY_F1) // x-movement
camera1.strafe(0.5);
else if (key == GLUT_KEY_F2)
camera1.strafe(-0.5);
else if (key == GLUT_KEY_F3) // y-movement
camera1.fly(0.5);
else if (key == GLUT_KEY_F4)
camera1.fly(-0.5);
else if (key == GLUT_KEY_F5) // z-movement
camera1.walk(0.5);
else if (key == GLUT_KEY_F6)
camera1.walk(-0.5);
else if (key == GLUT_KEY_F7) // yaw (by y-axis)
camera1.yaw(2.5);
else if (key == GLUT_KEY_F8)
camera1.yaw(-2.5);
else if (key == GLUT_KEY_F9) // pitch (by x-axis)
camera1.pitch(2.5);
else if (key == GLUT_KEY_F10)
camera1.pitch(-2.5);
else if (key == GLUT_KEY_HOME) // roll (by z-axis)
camera1.roll(2.5);
else if (key == GLUT_KEY_END)
camera1.roll(-2.5);
else if (key == GLUT_KEY_LEFT) // same as town
camera1.yaw(2.5);
else if (key == GLUT_KEY_RIGHT)
camera1.yaw(-2.5);
else if (key == GLUT_KEY_UP)
camera1.walk(0.5);
else if (key == GLUT_KEY_DOWN)
camera1.walk(-0.5);
glutPostRedisplay();
}
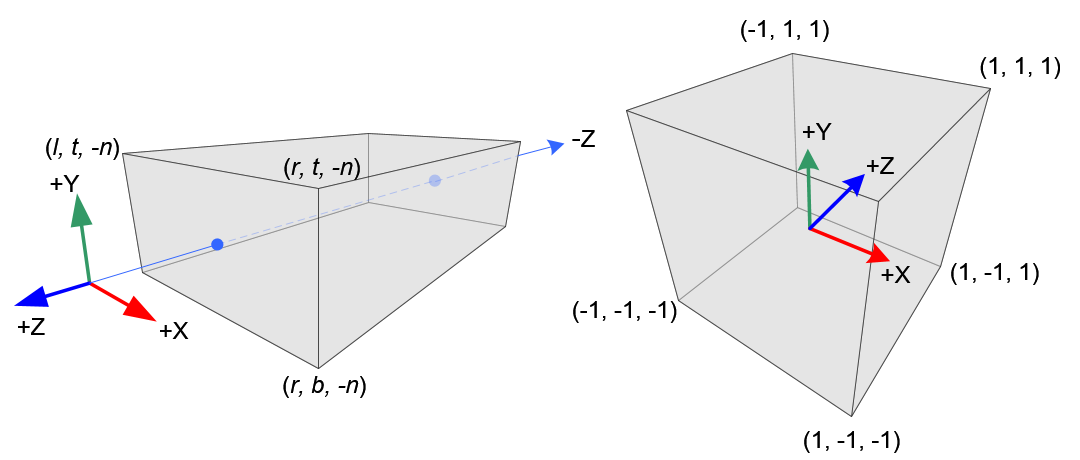
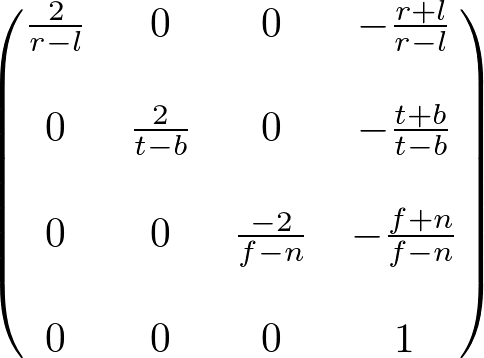
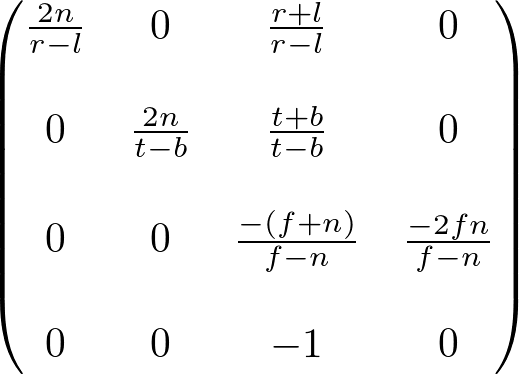
Projection Matrix

lecture12
lecture11
HW2
그래픽스 프로그래밍(321190) 실습 #2
– 3D graphics & hierarchical transformation & shading
(321190)
강사: 박경신
2014년 4월 24일
제출 방법: 2014년 5월 16일(금) 밤12시까지
(e-learning 강의실에 실행파일과 소스코드와 리포트를 전부 “학번이름_숙제2.zip”으로 묶어서 제출하도록 합니다. 또한, 소스코트 폴더에 .cpp만 담지 말고 비주얼 스튜디오에서 만든 프로젝트 폴더를 담기 바랍니다.) 9412924419.cpp1630232889.zip
참고자료: SimpleCar, SimpleSolar, SimpleMobile 등등
NOTE: 숙제 1의 기능을 활용해서 3차원 화를 한다.
0. Display window 크기는 1000 x 1000로 한다.
1. Hierarchical transformation 구조를 가진 ‘꽃/나무‘ 3종 이상을 만든다. (30점)
-Geometry 예제 (circle, cube, cylinder, sphere, square)와 Transformation 예제 (car, orbit, planet, robot, simple solar system)를 참고하여 본인만의 ‘꽃/나무 (내부 구성은 창의적으로)’를 구성하여 만든다.
-‘꽃/나무’에 사과, 배, 복숭아, 벚꽃 등등이 달려있다. (보고서에 스케치 첨부할 것)
-‘꽃/나무’ 물체는 적어도 3 단계 이상의 계층적 구조를 가진다. (움직임에 적용)
2. ‘Space bar’-key를 누르면 ‘꽃/나무’가 피어/자라난다. (20점)
-‘space bar’-key는 ‘꽃/나무’을 피어/자라나게 하는 button이다. 이 키를 다시 누르면 처음부터 다시 자라난다.
-움직이는 모드에서는 ‘꽃/나무’가 바람에 흔들리듯이 천천히 좌우로 움직이거나 회전을 한다. – 힌트: Idle() 함수를 사용할 것.
-가능하다면, 2단계 이상의 계층적 구조의 (즉, 부분적으로 다른) 움직임을 ‘꽃/나무’ 물체에 적용하도록 한다.
3. 메인 프로그램에서, 전체적인 장면에 조명과 재질을 사용하여 3차원 장면의 사실감을 더한다. (10점)
4. 창의성, 소스코드 주석처리, 리포트 (40점)
Hierarchical Transformation
Hierarchical Transformation
SimpleCar

SimpleRobot

SimpleSolar

//main.cpp ———————————————-
SimpleCar* car;
SimpleSolar* solar;
SimpleRobot* robot;
SimpleMobile* mobile;
void init()
{
// 중간생략
car = new SimpleCar();
robot = new SimpleRobot();
solar = new SimpleSolar();
mobile = new SimpleMobile();
}
void display()
{
// 중간생략
car->draw(&spMain, Projection, View, World);
robot->draw(&spMain, Projection, View, World);
solar->draw(&spMain, Projection, View, World);
mobile->draw(&spMain, Projection, View, World);
}
void update()
{
// 중간생략
car->update((float)deltaTime);
robot->update((float)deltaTime);
solar->update((float)deltaTime);
mobile->update((float)deltaTime);
glutPostRedisplay();
}
void specialkey(int key, int x, int y )
{
switch (key)
{
case GLUT_KEY_LEFT:
robot->setTheta(g_theta-=10.0f);
break;
case GLUT_KEY_RIGHT:
robot->setTheta(g_theta+=10.0f);
break;
// 중간생략
}
glutPostRedisplay();
}