lecture4
lecture4-ch2
lecture3
lecture3
lecture3-ch2
Lab0
lab0-moglclassShaderTriangle-src
lab0-moglclassShaderTriangle-Uniform-src
Shader class – readShaderSource, loadShader, deleteShader, isLoaded, getShaderID
Program class – createProgram, deleteProgram, attachShaderToProgram, linkProgram, useProgram, getProgramID, setUniform
VertexBufferObject class – createVBO, releaseVBO, mapBufferToMemory, unmapBuffer, bindVBO, uploadDataToGPU, addData, getDataPointer, getBuffer
HDTV 1080i/1080p
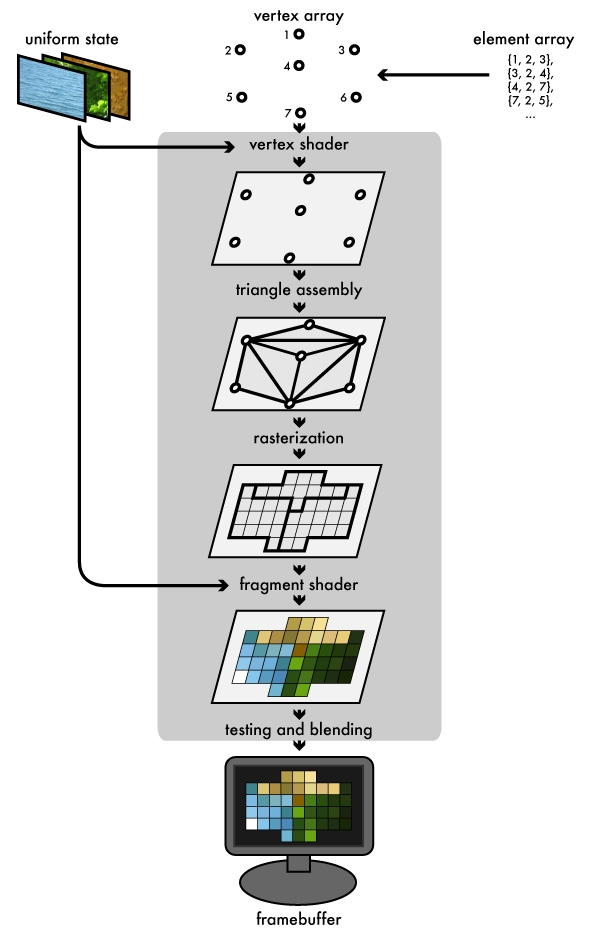
OPENGL PROGRAMMABLE PIPELINE

http://duriansoftware.com/joe/An-intro-to-modern-OpenGL.-Chapter-1:-The-Graphics-Pipeline.html
Modern OpenGL (OpenGL 3.x) 프로그래밍은 다음과 같은 단계로 진행한다.
1.Shader 프로그램을 만든다.
2.Vertex 자료를 Vertex Buffer Object (VBO)와 Vertex Array Object (VAO)를 만들고 이 자료를 쉐이더에 로딩한다.
3.이 자료의 위치와 쉐이더의 변수와 “연결(Connect)” 한다.
4.렌더링을 수행한다.
http://headerphile.com/sdl2/opengl-part-3-shaders-and-the-rendering-pipeline/
lecture2
lecture2
lecture1
lecture1
HW1
1 페이지 이상 보고서 (due by 9/13)
- History of Computer Graphics
- History of Computer Animation
- History of Teapot
- History of Video Games
- History of Virtual Reality
- History of Augmented Reality
- GPU Programming
- Silicon Graphics Industry
- Pixar RenderMan
- Volume Rendering
- Non-Photorealistic Rendering (NPR)
- ….
OPENGLGLUT-GETTING-STARTED
Windows10 운영체제에서 Visual Studio 2019과 OpenGL 3.x 이상을 지원하는 그래픽카드 드라이버가 설치되어 있어야 합니다.
1. freeglut는 아래 파일을 다운 받아 unzip해 주어야 합니다.
http://freeglut.sourceforge.net/
압축을 풀어보면 include, lib, system32 세 개의 폴더가 있습니다.
C:\………\freeglut-MSVC-3.0.0-2.mp\freeglut\include\GL
freeglut.h freeglut_ext.h freeglut_std.h glut.h
C:\………\freeglut-MSVC-3.0.0-2.mp\freeglut\lib
freeglut.lib
C:\………\freeglut-MSVC-3.0.0-2.mp\freeglut\bin
freeglut.dll
2. glew는 아래 파일을 다운 받아 unzip해 주어야 합니다.
http://glew.sourceforge.net/
압축을 풀어보면 include, lib, system32 세 개의 폴더가 있습니다.
C:\………\glew-2.1.0-win32\glew-2.1.0\include\GL
eglew.h glew.h glxew.h wglew.h
C:\………\glew-2.1.0-win32\glew-2.1.0\lib\Release\Win32
glew32.lib glew32s.lib
C:\………\glew-2.1.0-win32\glew-2.1.0\bin\Release\Win32
glew32.dll
3. glm는 아래 파일을 다운 받아 unzip해 주어야 합니다.
https://github.com/g-truc/glm/releases
C:\………..\glm-0.9.9.6\glm 안에 glm 디렉토리 전체를 복사
4. lab을 받아서 그 중 bin에 있는 *.dll을 Windows\system32 폴더에 넣는다.
C:\Windows\system32 폴더에 glew32.dll를 넣습니다.
C:\Windows\SysWOW64 폴더에도 freeglut.dll를 넣습니다.
C:\Windows\SysWOW64 폴더에도 glew32.dll를 넣습니다.
6. 세팅이 모두 끝나면, VS2019를 시작하고 C++ Console Empty Project 생성(Locatioon을 lab 디렉토리로 넣어주고 <your project name>을 넣는다)하고, 프로젝트 안에 clear.cpp 생성하고 아래의 소스를 넣어 컴파일, 실행해 봅니다.
/* minimal program to open & clear a window */
#include <stdlib.h>
#include <GL/glew.h>
#include <GL/freeglut.h>
#include <GL/freeglut_ext.h>

void init()
{
}

void display( void )
{
    glClearColor( 1.0, 1.0, 1.0, 1.0 ); // white background
    glClear( GL_COLOR_BUFFER_BIT ); // clear the window
    glFlush();
}

void keyboard( unsigned char key, int x, int y )
{
    switch ( key )
    {
    case 27: exit( EXIT_SUCCESS ); break;
    }
}

int main( int argc, char **argv )
{
    glutInit(&argc, argv);
    glutInitDisplayMode( GLUT_RGBA );
    glutInitWindowSize( 512, 512 );
    glutCreateWindow("Your First OpenGL");
    glewInit();
    init();
    glutDisplayFunc( display );
    glutKeyboardFunc( keyboard );
    glutMainLoop();
    return 0;
}
7. 이때, include와 lib 디렉토리를 지정하고, opengl32.lib glu32.lib glut32.lib 라이브러리 링크를 걸어줍니다.
Project->Properties(ALT+F7)->Configuration Properties탭->C/C++->General탭->Additional Include Directories에 “../include”를 넣는다.
Project->Properties(ALT+F7)->Configuration Properties탭->Linker탭->General탭에 Additional Library Directories에 “../lib;../lib/Release/Win32”를 넣는다.
Project->Properties(ALT+F7)->Configuration Properties탭->Linker탭->Input탭에 Additional Dependencies에 “glew32.lib;freeglut.lib”를 넣는다.
8. 컴파일/링크(Build)(F7)후 실행(Debug)(F5)시켜서 하얀색화면의 윈도우가 뜨면 완성된 것입니다.
lecture0
lecture0-Introduction to Computer Graphics
