OpenAL Getting Started
http://dis.dankook.ac.kr/lectures/med08/category/OpenAL
Wavefront obj export in 3DMax
http://dis.dankook.ac.kr/lectures/cg09/entry/Wavefront-obj-export-in-3DMax
simage library simage.zip
http://dis.dankook.ac.kr/lectures/cg07/entry/COIN3D-simage-library
All posts by kpark
HW3
그래픽스 프로그래밍 실습 #3
– 3D Model Loading, Texture mapping, Alpha blending
(321190)
강사: 박경신
2011년 5월 19일
7317779832.hwp
(e-learning 강의실에 실행파일과 소스코드와 리포트를 전부 “학번이름_숙제3.zip”으로 묶어서 제출하도록 합니다. 또한, 소스코트 폴더에 .cpp만 담지 말고 비주얼 스튜디오에서 만든 프로젝트 폴더를 담기 바랍니다.)
참고자료: oglclass.zip
(OpenAL 설치 요망 http://dis.dankook.ac.kr/lectures/med08/category/OpenAL)
NOTE: 실습 2의 모든 기능을 그대로 놓은 상태에서 추가 작업을 한다.
1. 본인이 제작한 Hierarchical Transformation 구조를 가진 캐릭터에 텍스쳐와 알파 블렌딩을 넣어준다. (30점)
-물체에 OpenGL texture mapping을 추가한다. 이때 적어도 2개 이상의 texture image을 사용한다.
2. 캐릭터가 사는 동산(또는 실내)을 만드는데 전체 장면에서 적어도 하나의 물체는 OpenGL의 alpha blending과 texture mapping을 적용하여 semi-transparent하게 만든다. 예를 들어, 구(sphere)에 알파 블랜딩을 적용한 나무잎 텍스쳐를 매핑시켜서 나무를 그리면 보다 입체적인 모습의 표현이 가능하다. (10점)
3. 전체 장면을 꾸며주기 위하여, 2개 이상의 3차원 모델을 로딩하여 그려준다. (10점)
-obj/3ds model loader를 사용하여 본인이 3DMAX나 MAYA로 (텍스쳐가 있는) 제작한 모델 2개 이상을 전체 장면에 넣어준다. (단, 본인이 직접 제작하지 않고 가져왔을 시 그 출처를 밝힐 것)
4. 캐릭터가 동산(또는 실내)에 걸어다니는 모드와 움직이는 물체 (예를 들어, 비행선, 붕붕자동차)을 타고 돌아다니는 Camera Control을 추가한다. (10점)
-‘1’ KEY를 눌렀을 때, 1인칭 시점(camera viewpoint)으로 변하고 전후좌우(UP/DOWN/LEFT/RIGHT)로 움직일 수 있다. 카메라의 기본 위치는 동산의 정중앙에서 바깥쪽을 바라보는 방향을 향한다.
-‘2’ KEY를 눌렀을 때, 시점이 본인이 제작한 움직이는 물체(비행선, 붕붕자동차)을 타고 있는 시점으로 변환한다.
5. 사운드 클래스 (OpenAL 라이브러리)를 사용하여 배경음악과 이벤트 사운드 추가한다. (10점)
6. 창의성, 소스코드 주석처리, 리포트 (30점)
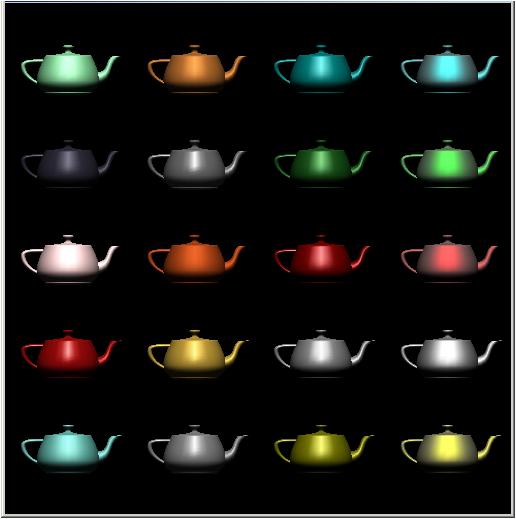
OpenGL Material
OpenGL Shading
shading model – FLAT/SMOOTH shademodel.cpp
 |  |
if (shading == GL_FLAT)
glShadeModel(GL_FLAT);
else if (shading == GL_SMOOTH)
glShadeModel(GL_SMOOTH);
glPushMatrix();
glTranslatef(-1.0, 0.0, 0.0);
glBegin(GL_TRIANGLES);
glColor3f(1, 0, 0); // red
glVertex3f(-1, -1, 4);
glColor3f(0, 1, 0); // green
glVertex3f(1, -1, 4);
glColor3f(0, 0, 1); // blue
glVertex3f(0, 1, 4);
glEnd();
glPopMatrix();
glPushMatrix();
glTranslatef(1.0, 0.0, 0.0);
glBegin(GL_TRIANGLES);
glColor3f(0, 0, 1); // blue
glVertex3f(-1, -1, 4);
glColor3f(0, 1, 0); // green
glVertex3f(1, -1, 4);
glColor3f(1, 0, 0); // red
glVertex3f(0, 1, 4);
glEnd();
glPopMatrix();
OpenGL Lighting and Shading
lecture14
lecture13
OpenGL Shadow Reflection
planar shadow (double blending effect) 6201891012.cpp

stencil shadow (stencil buffer to avoid double blending on shadow) 2273437428.cpp

// create a shadow matrix that will project the desired shadow
void buildShadowMatrix(GLfloat shadowMat[16], GLfloat plane[4], GLfloat lightpos[4])
{
GLfloat dot; // dot product of light position and ground plane normal
dot = plane[0]*lightpos[0] + plane[1]*lightpos[1] +
plane[2]*lightpos[2] + plane[3]*lightpos[3];
shadowMat[0] = dot – lightpos[0] * plane[0];
shadowMat[1] = – lightpos[0] * plane[1];
shadowMat[2] = – lightpos[0] * plane[2];
shadowMat[3] = – lightpos[0] * plane[3];
shadowMat[4] = – lightpos[1] * plane[0];
shadowMat[5] = dot – lightpos[1] * plane[1];
shadowMat[6] = – lightpos[1] * plane[2];
shadowMat[7] = – lightpos[1] * plane[3];
shadowMat[8] = – lightpos[2] * plane[0];
shadowMat[9] = – lightpos[2] * plane[1];
shadowMat[10] = dot – lightpos[2] * plane[2];
shadowMat[11] = – lightpos[2] * plane[3];
shadowMat[12] = – lightpos[3] * plane[0];
shadowMat[13] = – lightpos[3] * plane[1];
shadowMat[14] = – lightpos[3] * plane[2];
shadowMat[15] = dot – lightpos[3] * plane[3];
}
planar reflection (demonstrate reflection matrix)
9670376557.cpp
stencil reflection (stencil buffer to render mirror surface) 8244993501.cpp

// create a reflection matrix that will project the desired shadow
void buildReflectionMatrix(GLfloat reflectionMat[16], GLfloat plane[4])
{
reflectionMat[0] = 1 – 2 * plane[0] * plane[0];
reflectionMat[1] = – 2 * plane[0] * plane[1];
reflectionMat[2] = – 2 * plane[0] * plane[2];
reflectionMat[3] = – 2 * plane[0] * plane[3];
reflectionMat[4] = – 2 * plane[1] * plane[0];
reflectionMat[5] = 1 – 2 * plane[1] * plane[1];
reflectionMat[6] = – 2 * plane[1] * plane[2];
reflectionMat[7] = – 2 * plane[1] * plane[3];
reflectionMat[8] = – 2 * plane[2] * plane[0];
reflectionMat[9] = – 2 * plane[2] * plane[1];
reflectionMat[10] = 1 – 2 * plane[2] * plane[2];
reflectionMat[11] = – 2 * plane[2] * plane[3];
reflectionMat[12] = 0.0;
reflectionMat[13] = 0.0;
reflectionMat[14] = 0.0;
reflectionMat[15] = 1.0;
}
http://dis.dankook.ac.kr/lectures/cg09/entry/OPENGL-ShadowMatrix-ReflectionMatrix
OpenGL camera
town – LEFT/RIGHT/UP/DOWN – x축/z축으로 카메라의 위치를 움직임
uptown – LEFT/RIGHT/UP/DOWN – y축/x축으로 물체를 회전시킴
LEFT MOUSEBUTTON MOTION – x축과 y축으로 물체를 회전시킴
MIDDLE MOUSEBUTTON MOTION – x축과 y축으로 물체를 이동시킴
RIGHT MOUSEBUTTON MOTION – x축과 z축으로 물체를 이동시킴
camera class를 사용하여 x/y/x축 카메라의 위치이동과 x/y/x축 카메라의 방향이동
F1&F2 – x축 카메라 위치이동
F3&F4 – y축 카메라 위치이동
F5&F6 – z축 카메라 위치이동
F7&F8 – x축 카메라 방향이동 (PITCH)
F9&F10 – y축 카메라 방향이동 (YAW)
HOME&END – z축 카메라 방향이동 (ROLL)
http://dis.dankook.ac.kr/lectures/cg08/entry/camera-movement
OpenGL Projection Matrix
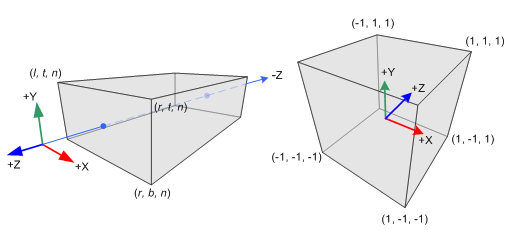
Orthographic Projection
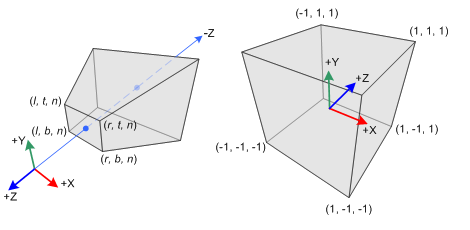
Perspective Projection
http://www.songho.ca/opengl/gl_projectionmatrix.html


