RSS 2.0 Specification
http://cyber.law.harvard.edu/rss/rss.html
All posts by kpark
Dialog & MDI
Mouse, Menu, Dialog
lecture10
lecture9
HW3
연습문제 (3)
|
□ 단원 : C# WinForm □ 목표 : C# Form, Controls, GUI, Dialog □ 주요 연습 내용 : collections, class, Form, 속성, FileIO 연습 □ 준비자료 : CurrencyExchange.cs |
연습문제 Ex3 (Due by 11/10 토 24시까지)
-cyber 강의실 (cyber.dku.edu)로 source code, executable file, solution/project VC# file, 보고서를 학번_이름_Ex3.zip으로 묶어서 낼 것. 보고서 (30%)
[연습문제]
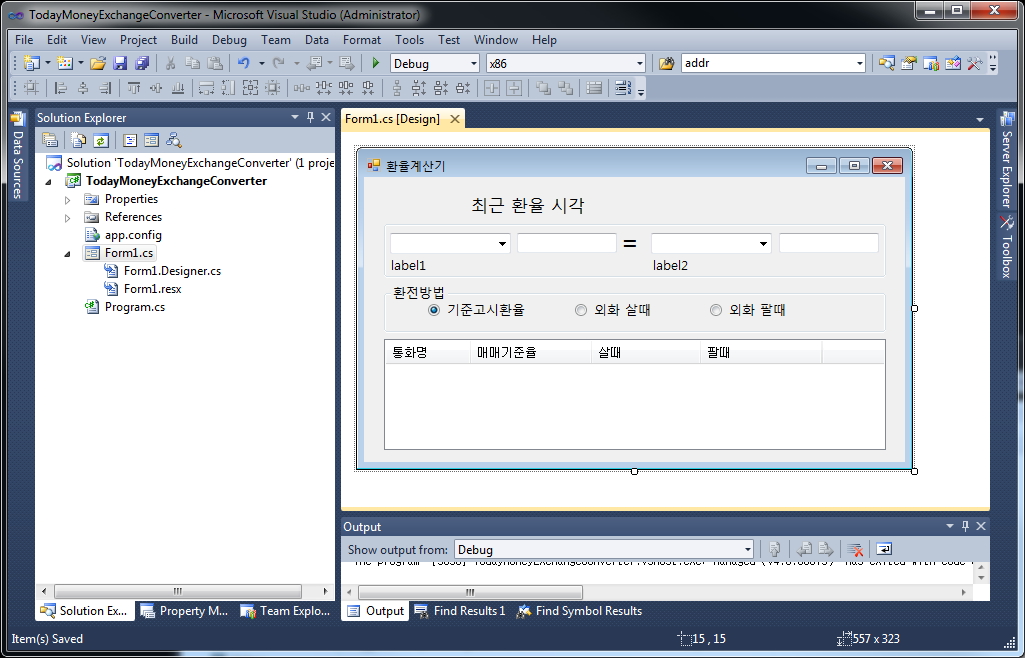
1. Form1에 각종 컨트롤을 추가한다. (10%)
– groupBox1(환전방법) & radioButton1 & radioButton2 & radioButton3
– groupBox2
– textBox1 & textBox2
– comboBox1 & comboBox2 (한국/미국/일본…)
– label1 & label2 (KRW…)
– label3 (=) & label4 (환율고시 최근업데이트 시각)
– listView1 (View 속성을 Details로 하고, Columns에 통화명, 매매기준율, 살 때, 팔 때 추가)
2. CurrencyExchange.cs 클래스와 CurrencyExchangeConverter.cs 클래스를 가지고CurrencyConverter.dll을 생성한다. (20%)
참조: http://dis.dankook.ac.kr/lectures/hci12/entry/C-Point-Point3D-Class-Assembly
경고: Reference에서 System.Windows.Forms를 추가해야 함
새프로젝트 -> Class Library 선택해서 CurrencyConverter로 생성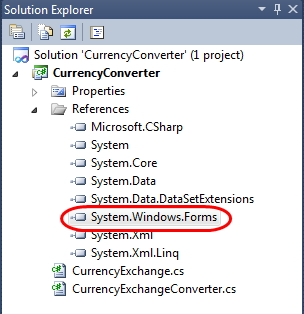
CurrencyExchangeConverter 클래스
– 멤버 필드
+static Dictionary<string, CurrencyExchange> currencies; // 환율 데이터
+static DateTime lastUpdated; // 최근 업데이트 시각
+static string filename; // 환율 데이터를 저장하는 파일명 (lastUpdated를 이용하여 파일명 생성, 예: 2012-11-01_17-55-10.txt)
– 속성
+public static DateTime LastUpdated { get; }
=> lastUpdated 반환 (label4에서 사용)
– 메소드
+static CurrencyExchangeConverter()
=> currencies 생성, DownloadTodayCurrencyExchangeRates, WriteFile
+static void DownloadTodayCurrencyExchangeRates()
=> 네이버 환율 사이트에서 데이터를 받아서 currencies에 저장
+static void WriteFile()
=> currencies 데이터를 파일로 저장 (이미 파일이 존재할 시 저장 안함)
+public static Dictionary<string, CurrencyExchange> GetCurrencyExchangeList()
=> currencies 데이터를 반환
+ICollection<string> GetCurrencyExchangeKeys()
=> currencies에서 Keys를 반환 (comboBox1&2에서 사용)
+public static ICollection<CurrencyExchange> GetCurrencyExchangeValues()
=> currencies에서 Values를 반환 (listView1에서 사용)
+public static string GetCurrencySign(string hname)
=> currencies 데이터에서 hname (예: 미국)을 가지고 해당 sign (예: USD)
반환 (label1&2에서 사용)
+public static double Exchange(string fromCurrency, string toCurrency, ExchangeMethod
method, double value)
=> currencies 데이터에서 환전방법(기준/살 때/팔 때)에 따라서 환율을
받아와서 환전을 계산 (공식: value * (fromRate/toRate) )
3. CurrencyConverter.dll을 이용하여 Form1에서 환율계산기를 작성한다. (20%)
경고: Reference에서 CurrencyConverter.dll를 추가해야 함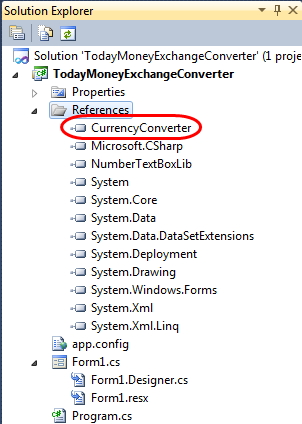
– Form1_Load
=> 초기화 상태를 만들어 준다.
=> comboBox1&2는 CurrencyExchangeConverter.GetCurrencyExchangeKeys() 사용
=> listView1은 CurrencyExchangeConverter.GetCurrencyExchangeValues() 사용 (listView에 Item 추가 시 한국은 빼준다.)
=> label4는 CurrencyExchangeConverter.LastUpdated 사용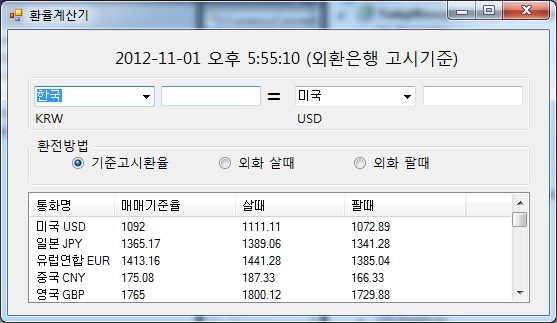
– radioButton_CheckChanged
=> radioButton1/2/3을 Checked하면 ExchangeMethod.Standard/Buy/Sell로 선택
– comboBox1_SelectedIndexChanged & comboBox2_SelectedIndexChanged
=> comboxBox1/2에서 “유럽연합” 선택하면 label1/2을 EUR로 바꿔줌
=> CurrencyExchangeConverter.GetCurrencySign(…) 사용 (단, 일본은 “JPY 100”로 바꿔줌)
– textBox1_KeyPress & textBox2_KeyPress
=> 실제 textBox1 또는 textBox2에 넣은 value 값으로 환율변환을 계산하여 상대방 쪽에 보여줌
=> CurrencyExchangeConverter.Exchange(…) 사용 (단, 일본은 100엔 기준임)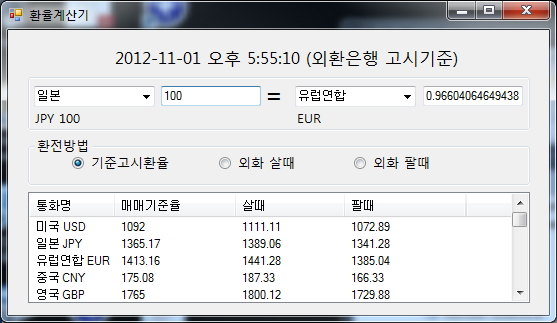
4. 일반 TextBox 대신 숫자만 입력받을 수 있는 사용자 정의 컨트롤 (NumberTextBox)를 사용하거나, 본인이 원하는 기능을 더 추가한다. (10%)
참조: http://dis.dankook.ac.kr/lectures/hci12/entry/Number-Only-Textbox
http://dis.dankook.ac.kr/lectures/hci12/entry/Custom-Control
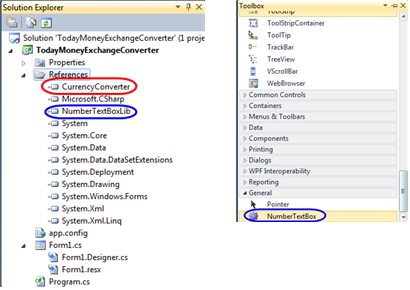
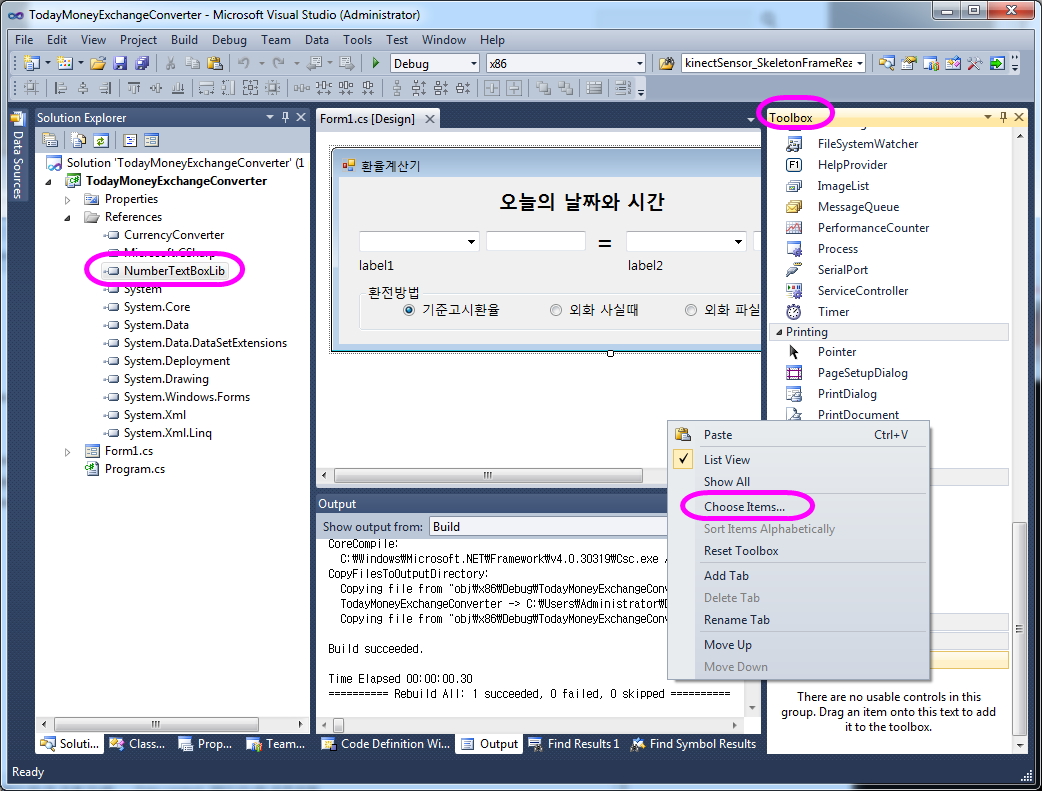
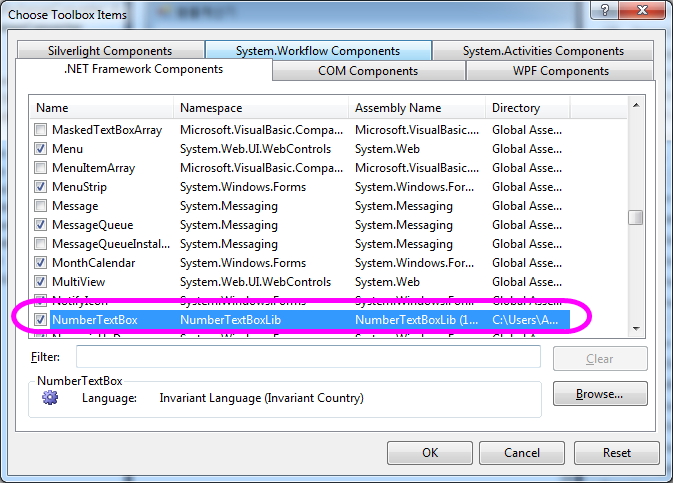
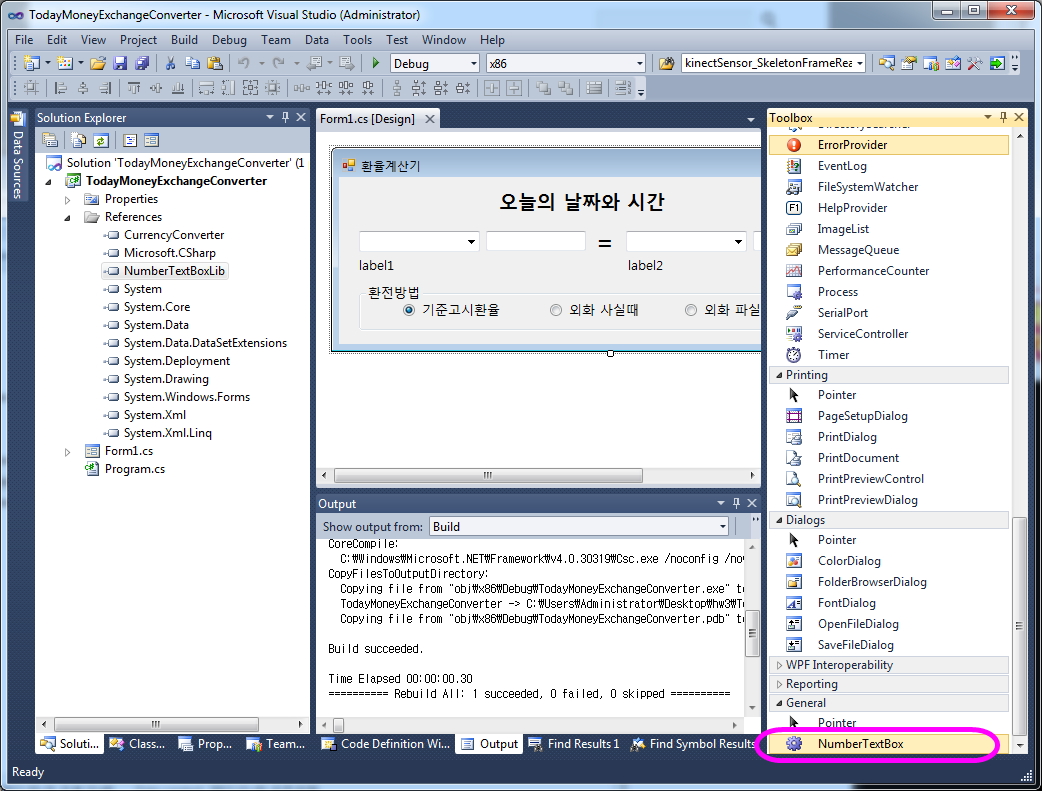
경고: Reference에서 NumberTextBoxLib.dll를 추가해야 함 & 도구상자 (Toolbox)에서 오른쪽마우스버튼을 누르고 팝업메뉴에서 아이템선택 (Choose Items)을 한 후 Browse해서 직접 NumberTextBoxLib.dll을 선택하면 NumberTextBox라는 컨트롤이 생성 됨
– numberTextBox1 & numberTextBox2
Custom Control
사용자 정의 컨트롤
-기존 컨트롤을 상속받아 사용자 정의 새로운 컨트롤을 작성
-UserControl을 상속받아 합성 컨트롤을 작성
1. 파일 메뉴->새로 만들기->프로젝트
Visual C# 프로젝트 목록에서 “Windows Forms 컨트롤 라이브러리” 선택하고 이름을 “NumberTextBoxLib”을 입력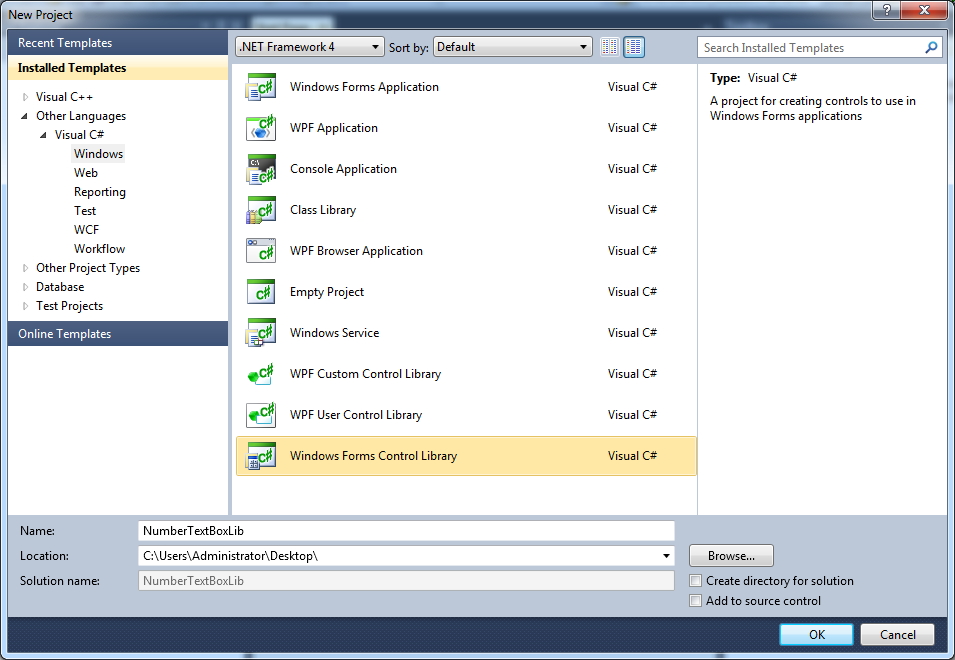 2. 솔루션 탐색기에서 UserControl1.cs를 NumberTextBox.cs로 변경
NumberTextBox.cs 코드에서 상속을 UserControl에서 TextBox로 변경
public partial class NumberTextBox: TextBox
NumberTextBox.Designer.cs에 InitializeComponent()에서 AutoScaleMode 속성은 삭제
NumberTextBox.cs 코드에서 OnKeyPress(…) 메소드를 재정의
솔루션을 빌드하면 컨트롤이 완성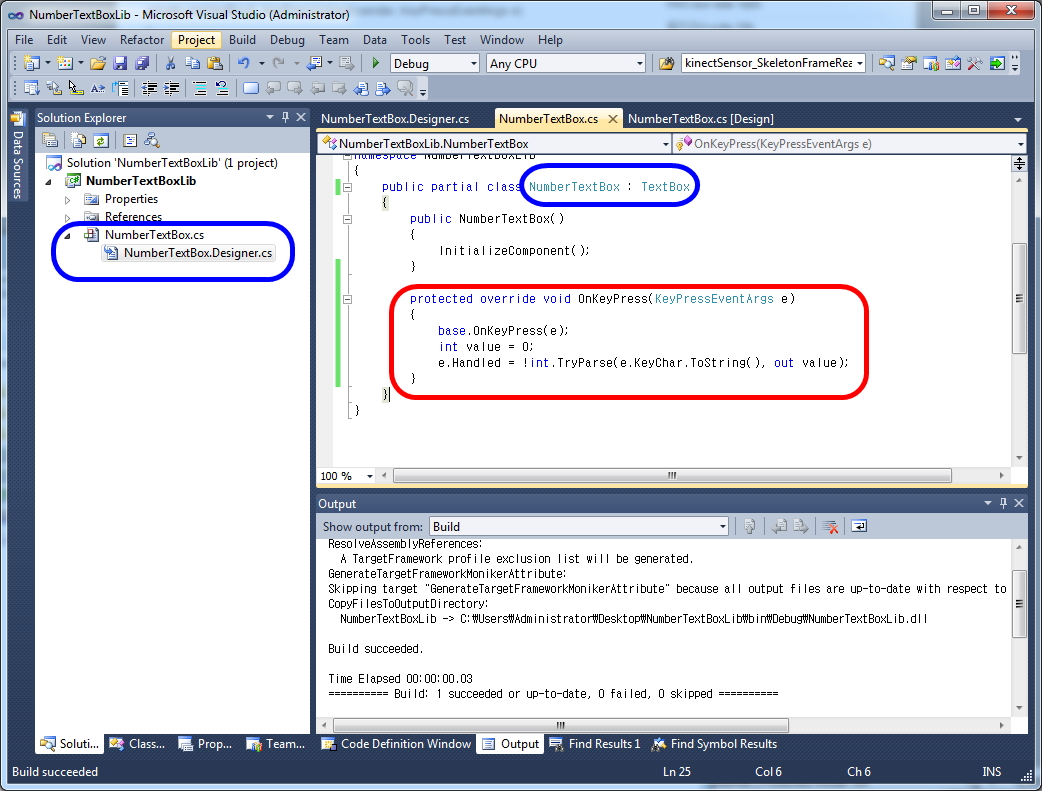 ———————————————————————————————————-
사용자 정의 컨트롤 사용
1.솔루션 탐색기의 “참조”에 “NumberTextBoxLib.dll”를 “참조추가”
“도구상자”에서 오른쪽 마우스 “항목선택”을 한 후 “찾아보기” 버튼에서 “NumberTextBoxLib.dll” 다시 로딩한 후, “NumberTextBox” 에 체크가 됬는지 확인
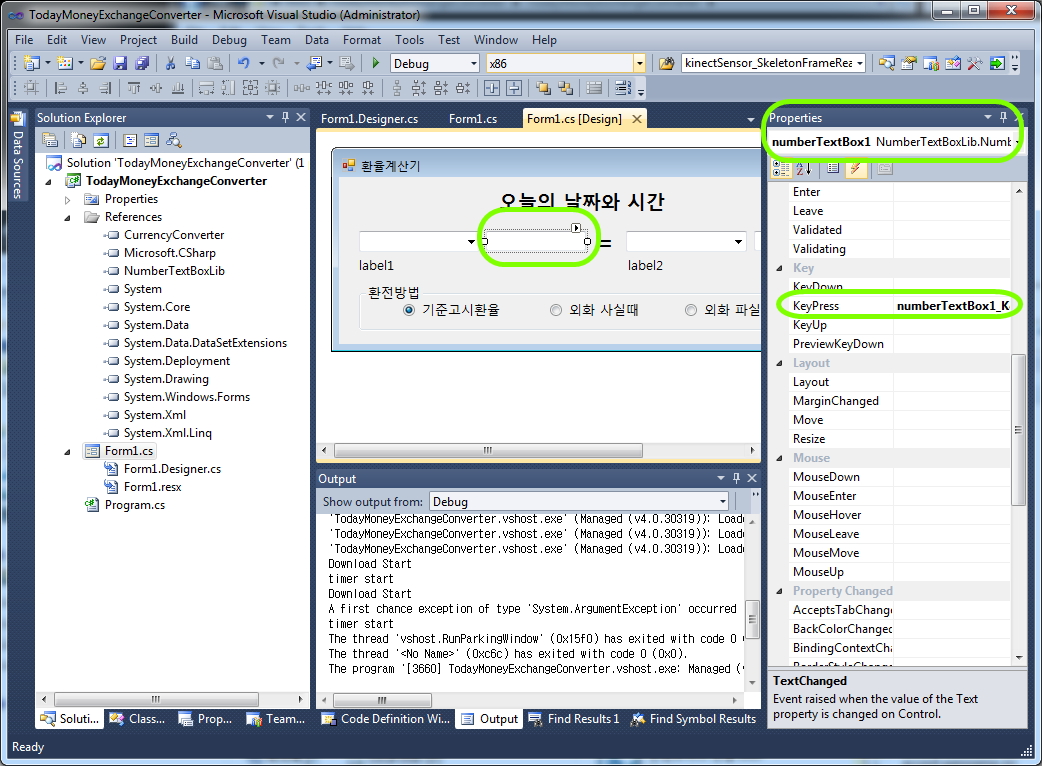
2. 폼에 “NumberTextBox”를 사용하여 디자인하고 솔루션을 빌드하면 컨트롤이 완성
네이버 오늘의 환율 시세 출력에서 last_update 추가 (C#)
// 네이버 오늘의 환율 시세 출력 (C#)
public void DownloadTodayCurrencyExchangeRates()
{
WebClient client = new WebClient();
client.Headers.Add(“Referer”, “http://blog.naver.com/usback“);
Stream xmlDataStream = client.OpenRead(
“http://www.naver.com/include/timesquare/widget/exchange.xml“);
XmlReader reader = XmlReader.Create(xmlDataStream);
reader.MoveToContent();
// last_update
reader.ReadToFollowing(“last_update”);
string lastUpdate = reader.ReadElementContentAsString(“last_update”,
reader.NamespaceURI);
int year = int.Parse(lastUpdate.Substring(0, 4));
int month = int.Parse(lastUpdate.Substring(4, 2));
int day = int.Parse(lastUpdate.Substring(6, 2));
int hour = int.Parse(lastUpdate.Substring(8, 2));
int minute = int.Parse(lastUpdate.Substring(10, 2));
int second = int.Parse(lastUpdate.Substring(12, 2));
lastUpdated = new DateTime(year, month, day, hour, minute, second);
while (reader.ReadToFollowing(“currency”))
{
reader.ReadToFollowing(“hname”);
string hname = reader.ReadElementContentAsString(“hname”,
reader.NamespaceURI);
reader.ReadToFollowing(“standard”);
double standard = reader.ReadElementContentAsDouble(“standard”,
reader.NamespaceURI);
reader.ReadToFollowing(“buy”);
double buy = reader.ReadElementContentAsDouble(“buy”,
reader.NamespaceURI);
reader.ReadToFollowing(“sell”);
double sell = reader.ReadElementContentAsDouble(“sell”,
reader.NamespaceURI);
reader.ReadToFollowing(“sign”);
string sign = reader.ReadElementContentAsString(“sign”,
reader.NamespaceURI);
Console.WriteLine(“{0}\t{1}\t{2}\t{3}\t{4}”, hname, standard, buy, sell, sign);
}
}
Number Only Textbox
private void textBox1_KeyPress(object
sender, KeyPressEventArgs e)
{
int value = 0;
e.Handled = !int.TryParse(e.KeyChar.ToString(), out value);
}
private void
textBox2_KeyPress(object sender, KeyPressEventArgs e)
{
if (!System.Text.RegularExpressions.Regex.IsMatch(e.KeyChar.ToString(), “\\d+”))
e.Handled = true;
}
// NumberTextBoxLib custom control (inherited from TextBox)
public
partial class NumberTextBox : TextBox
{
public NumberTextBox()
{
InitializeComponent();
}
protected override void OnKeyPress(KeyPressEventArgs e)
{
base.OnKeyPress(e);
int value = 0;
e.Handled = !int.TryParse(e.KeyChar.ToString(), out value);
}
}
C# Windows Forms Controls
Label, Button 사용예
http://dis.dankook.ac.kr/lectures/hci09/entry/Controls
Buttons
http://dis.dankook.ac.kr/lectures/hci09/entry/Buttons
GroupBox
http://dis.dankook.ac.kr/lectures/hci09/entry/GroupBox
TextBox
http://dis.dankook.ac.kr/lectures/hci09/entry/TextBox
LinkedLabel
http://dis.dankook.ac.kr/lectures/hci09/entry/Linked-Label
ListBox
http://dis.dankook.ac.kr/lectures/hci09/entry/ListBox
Poll
http://dis.dankook.ac.kr/lectures/hci09/entry/Poll
PictureBox
http://dis.dankook.ac.kr/lectures/hci09/entry/Picture-Timer
TabControl
http://dis.dankook.ac.kr/lectures/hci09/entry/Tab-Control
TreeControl
http://dis.dankook.ac.kr/lectures/hci09/entry/Tree-Control
ListView
http://dis.dankook.ac.kr/lectures/hci09/entry/ListView
Textbox (Number Only)
http://dis.dankook.ac.kr/lectures/hci09/entry/Number-Only-Textbox

